Step-by-Step Guide to Creating the Perfect Cut Crease
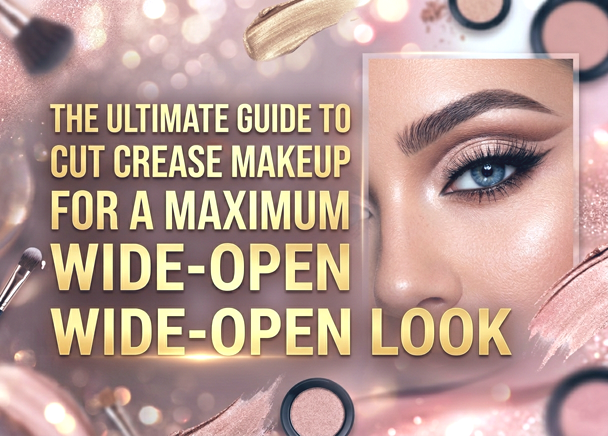
The cut crease technique is one of the most effective techniques in eye makeup. The main purpose of this method is to clearly outline the crease of the eyelid, creating a contrast between the movable and fixed part. It not only looks graphic and stylish, but also visually "opens up" the look, making the eyes bigger and more expressive.
We're figuring out how to do this makeup to make it look professional, even if you're doing it for the first time.
Preparation: the foundation of success
Cut crease requires a flawless "base". Since the technique is based on contrast, you will need:
A dense concealer or a light-colored shadow base. This is the key tool for "cutting" the crease.
A flat synthetic brush. It should be thin and firm, as this is the brush you will use to draw a clear line.
Matte shadows. One dark shade for darkening the crease and one light shade for the mobile eyelid.
Step-by-Step Instructions
Step 1: Creating Depth
Apply a transition shade of eyeshadow (medium brown or gray-beige) to the crease of the eyelid, blending it carefully towards the temple. Then take a darker shade and deepen the crease itself. Don't be afraid to extend the line slightly above the anatomical crease of the eye, as this can help visually enlarge the eyelid (a useful trick for "hanging" eyelids).
Step 2: The Magic of "Cutting Out"
Apply a small amount of concealer to a flat brush. Look straight into the mirror: place the brush at the beginning of the crease and gently draw a line along the mobile eyelid, following its curve.
Tip: To ensure that the concealer applies perfectly, look straight ahead so that you can see where the line should be drawn so that it doesn't "hide" when the eye is open.
Step 3: Fill in the color
Fill in the "cutout" space with light shadows or shimmer. Gently run your finger or a clean brush along the border between the dark color in the crease and the light color on the mobile eyelid to soften the transition (but do not blend it into a smoky effect; the transition should remain clear).
Step 4: Graphic emphasis
To make your eyes look as wide as possible, emphasize the crease with a thin line of eyeliner or dark shadows using a thin, angled brush. This will add a dramatic and focused look to your makeup.
The key secrets of professionals
Do not neglect using powder. If you have oily eyelid skin, lightly powder the area before applying concealer, so that your makeup doesn't run off after a couple of hours.
Pay attention to symmetry. If one eye appears smaller than the other, apply the concealer line slightly higher on that eye.
Lashes are the finishing touch. For the cut crease technique, it's ideal to use false lashes in the outer corners of the eyes. This elongates the eye shape (the "fox eye") and enhances the open-eyed effect.
Light in the corner. Add a drop of highlighter to the inner corner of the eye — this will instantly refresh your face and remove traces of fatigue.
Who is this makeup suitable for?
Cut crease is a universal technique. It is ideal for those with deep-set eyes or hooded eyelids, as it visually "lifts" them. However, remember that the clearer the line, the more festive and evening-looking the look. For a daytime option, you can use the "soft cut crease" technique, where the borders between colors are slightly more blended.
Experiment with textures: matte concealer and bright pigments are the trend of the season, making you the star of any event!